Contents
- Introduction
- Prerequisites
- Support and Resources
- Objective
- Azure Portal Access
- Step 1: Create a Resource Group
- Step 2: Create a Virtual Network and Subnet
- Step 3: Deploy an Azure Service (e.g., Azure Storage Account)
- Step 4: Create a Private Endpoint
- Step 5: Test the Private Endpoint Connectivity
- Step 6: Disable Public Network Access (Optional but Recommended)
- Step 7: Clean Up Resources (Optional)
- Conclusion
- Resources and Next Steps with Azure Private Link
Introduction
In this blog post, “Creating and Configuring Private Link and Private Endpoints in Azure“, we’ll explore how to enhance network security with Azure Private Link and Private Endpoints. These features enable secure access to Azure services via a private network, avoiding exposure to the public internet.
As organisations increasingly rely on cloud resources, these tools provide a vital way to connect on-premises or virtual networks directly to Azure services securely.
Stay tuned as we dive into the hands-on aspects of Azure Private Link and Private Endpoints. Subscribe to our updates, and let’s continue our exploration of Azure’s powerful networking solutions!
Prerequisites
Before we begin, ensure you have the following:
- Azure Subscription: You’ll need an active Azure subscription. If you don’t have one, you can sign up for a free account and receive free credits by visiting the Azure Free Account page.
- Azure Virtual Network (VNet): A VNet is required to deploy private endpoints. If you haven’t set one up yet, we’ll create one as part of this tutorial.
- Basic Understanding of Azure Networking: Familiarity with Azure VNets, subnets, and network security concepts will be beneficial.
Support and Resources
In addition to the key resources mentioned, there are several avenues where you can find comprehensive support and valuable information regarding Azure Private Link and Private Endpoints:
- Azure Private Link Documentation: The official Azure Private Link documentation on Microsoft Learn provides detailed guides, tutorials, and reference materials.
- Azure Networking Community: Engage with other Azure users and experts in the Azure Networking Community to ask questions and share insights.
- Azure Blog: Stay informed about the latest updates, feature releases, and best practices by following the Azure Networking Blog.
By leveraging these resources, you can enhance your understanding and effectively implement Azure Private Link and Private Endpoints in your environment.
Objective
As the assigned Cloud Network Engineer, your objective is to securely connect to Azure services using Private Link and Private Endpoints. You will:
- Create a Virtual Network (VNet) and a Subnet for the private endpoints.
- Deploy an Azure Service (e.g., Azure Storage Account or Azure SQL Database).
- Configure a Private Endpoint to privately and securely access the Azure service from your VNet.
- Validate the connectivity to the service via the Private Endpoint.
- Restrict Public Network Access to the Azure service, ensuring all traffic flows through the Private Endpoint.
Azure Portal Access
First and foremost, we need to visit https://portal.azure.com, the central location where we’ll be deploying all components for our Azure Private Link setup. Sign in using your Azure credentials.

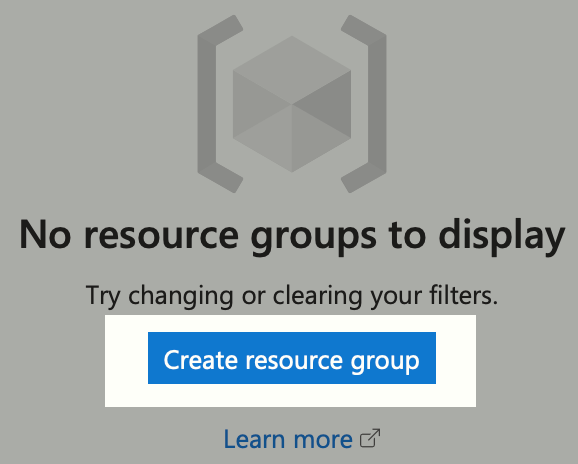
Step 1: Create a Resource Group
Organise all your resources by creating a new Resource Group.
- In the Azure portal, search for Resource Groups in the search bar.
- Click on Create.
3. Fill in the necessary details:
- Subscription: Select your Azure subscription.
- Resource Group Name: Enter a meaningful name, e.g., rg-privatelink.
- Region: Choose the appropriate region, e.g., East US.
4. Click Review + Create, then Create.

Step 2: Create a Virtual Network and Subnet
A Virtual Network (VNet) and Subnet are required for deploying Private Endpoints.
- Search for Virtual Networks in the Azure portal.
- Click on Create.
- In the Basics tab:
- Subscription: Your subscription should be selected.
- Resource Group: Choose rg-privatelink.
- Name: Enter a name for your VNet, e.g., PrivateLinkVNet.
- Region: Ensure it matches the region of your resources.

- Click Next: IP Addresses.
- In the IP Addresses tab:
- IPv4 Address Space: Keep the default or specify your own, e.g., 10.0.0.0/16.
- Subnet can also keep the default or specify your own.
- Click Add, then Review + Create, and finally Create.

Step 3: Deploy an Azure Service (e.g., Azure Storage Account)
We’ll use an Azure Storage Account for this example.
- Search for ‘Storage accounts’ in the Azure portal.
- Click on Create.
- In the Basics tab:
- Subscription: Your subscription.
- Resource Group: Choose rg-privatelink.
- Storage Account Name: Enter a unique name, e.g. mystorageaccount12345.
- Region: Same as your VNet.
- Keep the default settings, or adjust as required for Performance and Redundancy.
- Click Review + Create, then Create.

Step 4: Create a Private Endpoint
Now, let’s create a Private Endpoint to securely access the storage account.
- Navigate to your newly created storage account.
- In the Settings section, click on Networking.
- Under Private endpoint connections, click + Private endpoint.

- In the Basics tab:
- Name: Enter StorageAccountPrivateEndpoint.
- Region: Same as your storage account.
- Click Next: Resource.
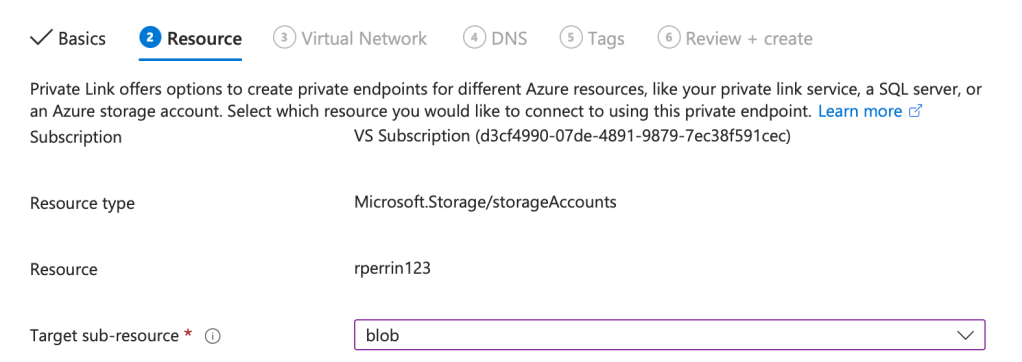
- In the Resource tab:
- Subscription: Your subscription.
- Resource Type: Select Microsoft.Storage/storageAccounts.
- Resource: Choose your storage account.
- Target Sub-resource: Select blob (or the service you wish to access).
- Click Next: Virtual Network.
- In the Virtual Network tab:
- Virtual Network: Select PrivateLinkVNet.
- Subnet: Choose default.
- Private IP Configuration: Dynamically allocate.
- Click Next: DNS, leave the DNS configuration as default or change to custom as required.
- Click Next: Tags then Next: Review + create, and finally Create.
Step 5: Test the Private Endpoint Connectivity
Deploy a Virtual Machine (VM) in the PrivateLinkVNet default subnet.
- Search for Virtual machines, click Create.
- In the Basics tab, fill in the required details:
- Resource Group: rg-privatelink.
- Name: TestVM.
- Region: Same as your other resources.
- Image: Choose Windows Server 2022 Datacenter or Ubuntu 24.04 LTS.
- Size: Accept the default or choose based on your needs.
- Authentication: Provide username and password or SSH key.
- Inbound Port Rules: Allow RDP (3389) for Windows or SSH (22) for Linux.

- Networking tab:
- Virtual Network: PrivateLinkVNet.
- Subnet: Default subnet.
- Public IP: Assign a public IP to access the VM remotely.
- Complete the VM creation.

- Connect to the VM using RDP or SSH.

- Once connected, test access to the storage account:
- Open Command Prompt.
- Use nslookup mystorageaccount12345.blob.core.windows.net.
- Verify that the IP address returned is the private IP of the Private Endpoint.

- Try accessing the storage account:
- Install Azure Storage Explorer and connect to the Storage Account.
- Once connected, we will then move onto the next step of blocking public network access.

Step 6: Disable Public Network Access (Optional but Recommended)
To ensure all traffic uses the Private Endpoint:
- Navigate to your storage account.
- Go to Networking.
- Under Firewalls and virtual networks, select Disable public access or Selected networks.
- Save the changes.

This step prevents access to the storage account over the public internet.
- Now attempt to upload a file via Storage Explorer to confirm you are utilising the Private Endpoint.

Step 7: Clean Up Resources (Optional)
If you’re done with this setup and wish to avoid charges:
1. Delete the Resource Group rg-privatelink. This action will delete all resources within it.

Conclusion
Congratulations! You’ve successfully set up Azure Private Link and Private Endpoints to securely access your Azure service over a private network. This configuration enhances your security posture by eliminating exposure to the public internet and simplifying your network architecture.
Resources and Next Steps with Azure Private Link
To continue your journey with Azure Private Link and Private Endpoints, explore the following resources:
- Azure Private Link Documentation: Azure Private Link documentation
- Azure Networking Community: Azure Networking Community
- Azure Networking Blog: Azure Networking Blog
These resources offer detailed guides, best practices, and community support to help you deepen your understanding and effectively implement these features in your environment.
I’m eager to hear your thoughts on this blog post and would greatly value your feedback. Feel free to connect with me on LinkedIn or drop me an email—links are at the top and bottom of this page 🙂
Interested in staying updated with my latest releases? Don’t miss my future blog posts. Subscribe by entering your email in the box below, and stay tuned for every new update!
Thank you for spending part of your day here. I hope you find your journey into Azure Private Link and Private Endpoints as rewarding as I have.
Stay Connected,
Ryan

Leave a comment