Contents
- Introduction
- Prerequisites
- Support and Resources
- Objective
- Azure Portal Access
- Step 1: Review Your Entra ID Tenant Structure
- Step 2: Enable and Configure Multi-Factor Authentication
- Step 3: Creating a Conditional Access Policy
- Step 4: Validate the Policy
- Step 5: Fine-Tune the Policy
- Step 6: Additional Controls and Scenarios
- Step 7: Clean Up (Optional)
- Conclusion
- Resources and Next Steps with Conditional Access
Introduction
In today’s post, “Creating and Configuring Conditional Access Policies in Azure” we’ll guide you through creating and configuring Conditional Access Policies in Azure using Entra ID.
By evaluating factors like user identity, device state, location, application sensitivity, and risk level, Conditional Access helps you enforce Zero Trust principles.
The result is a more secure, dynamic approach that ensures only authorised users under the right conditions can access your organisation’s cloud applications—strengthening security, enhancing user experience, and reducing the risk of unauthorised access.
Stay tuned as we dive into the hands-on aspects of configuring and testing Conditional Access Policies in Azure.
Subscribe to our updates, and let’s continue our exploration of Azure’s powerful identity and security solutions!
Prerequisites
Before we begin, ensure you have the following:
- Entra ID Premium Licence: Conditional Access requires Entra ID Premium P1 or P2 licence. If you don’t have one, you can explore trial options or review licensing details on the Entra ID pricing page.
- Global Administrator or Security Administrator Privileges: You need the appropriate permissions in Entra ID to create and manage Conditional Access policies.
- Basic Understanding of Entra ID and Identity Concepts: Familiarity with users, groups, and authentication processes in Entra ID will be beneficial.
Support and Resources
In addition to the key resources mentioned, there are several avenues where you can find comprehensive support and valuable information regarding Azure Conditional Access:
- Entra ID Conditional Access Documentation: The official Microsoft Learn documentation provides detailed guides, tutorials, and reference materials.
- Entra Community: Engage with other Azure users and experts in the Entra Community to ask questions and share insights.
- Microsoft Entra Blog: Stay informed about the latest updates, feature releases, and best practices by following the Microsoft Entra Blog.
By leveraging these resources, you can enhance your understanding and effectively implement Conditional Access in your environment.
Objective
As the assigned Cloud Security Engineer, your objective is to secure access to your cloud applications and resources using Conditional Access. You will:
- Identify the users and applications that require Conditional Access policies.
- Define conditions (e.g., device compliance, location, or sign-in risk) and controls (e.g., MFA, blocking access).
- Create and configure a Conditional Access policy in Entra ID.
- Validate the policy’s effectiveness by simulating sign-in scenarios.
- Fine-tune the policy based on your organisation’s security and usability needs.
Azure Portal Access
- First and foremost, we need to visit https://portal.azure.com, the central location where we’ll be deploying all components for our Azure Private Link setup. Sign in using your Azure credentials.

Step 1: Review Your Entra ID Tenant Structure
Before configuring policies, ensure you know which users, groups, and applications will be targeted:
- In the Azure portal, search for Entra ID and select it.
- Navigate to Users to confirm the identities you wish to target.
- Navigate to Groups if you plan to apply policies to specific groups instead of individual users.
- Navigate to Enterprise applications to identify which apps will be protected by Conditional Access.

Having this clarity ensures you create policies that are both effective and minimally disruptive to legitimate business operations.
Step 2: Enable and Configure Multi-Factor Authentication (Optional)
Many Conditional Access policies leverage MFA as a control. If you haven’t already set up your Authentication Methods:
- From Entra ID, select Security > Authentication Methods.
- Configure your required MFA methods for your users. E.g., Microsoft Authenticator, Passkey (FIDO2), SMS/Voice.

Step 3: Creating a Conditional Access Policy
Now, let’s create your first Conditional Access policy. For this example, we’ll configure a policy that requires MFA for users accessing Microsoft 365 from outside your trusted network:
- In the Azure portal, navigate to Entra ID.
- Under Security, click on Conditional Access.
- Click on + New policy and select + New custom policy.
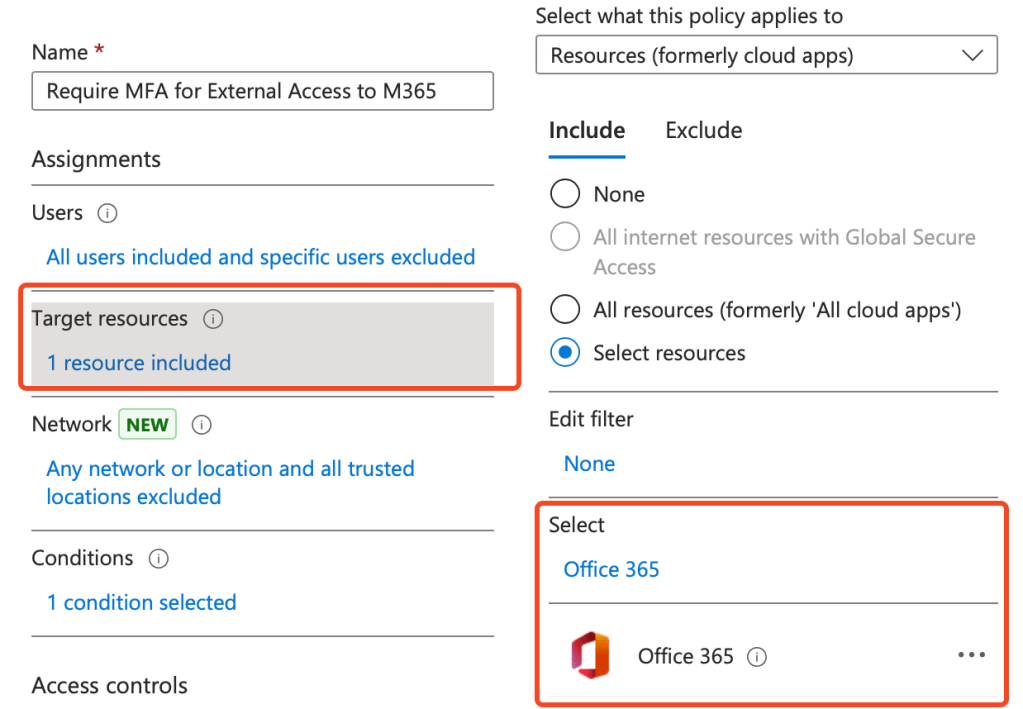
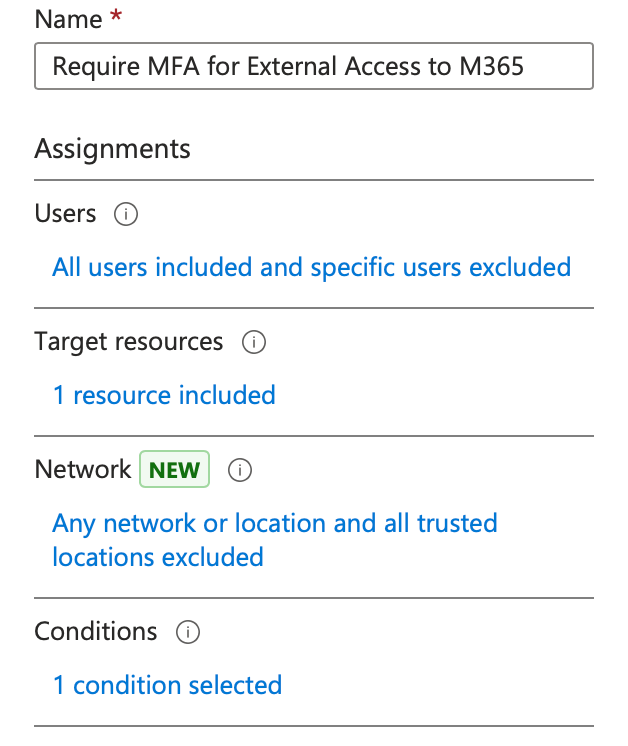
- Name: Enter a descriptive name, e.g. Require MFA for External Access to M365.
- Assignments:
- Users: Include your required users or groups.
Note: Remember to exclude any break glass or administrator accounts during testing.

- Cloud Apps or Actions: Select the application you want to protect, e.g., Office 365.
- Conditions:
- Expand the Conditions section to set the criteria. For example:
- Locations: Configure a named location representing your corporate network and then set the policy to apply when a user is not connecting from that trusted location.
- Device State (optional): Require compliant devices or exclude hybrid Entra ID joined devices if needed.

- Access Controls:
- Under Grant, choose Require authentication strength: multi-factor authentication.
- Ensure Require all the selected controls is selected if you have multiple controls.

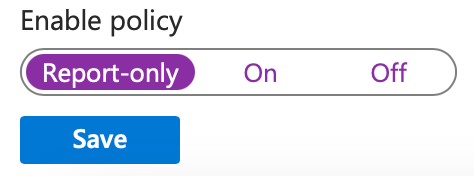
- Enable Policy: Set the policy state to On or Report-only for testing.
- Click Create.

Step 4: Validate the Policy
After creating the Conditional Access policy, test it to ensure it behaves as expected:
- From a user’s perspective:
- Sign out of the Azure portal and then sign in again from a location not designated as trusted.
- Attempt to access Office 365.

- You should be prompted for MFA before gaining access. If MFA isn’t prompted, review the policy assignments, conditions, and any exclusions.
Tip: Start with a limited user group or a test account to ensure your policy doesn’t unintentionally impact all users or critical services.
Step 5: Fine-Tune the Policy
You may need to adjust your policy based on user feedback or unexpected scenarios:
- Revisit the Conditional Access policy to adjust conditions, locations, or groups.

- Consider using the Report-only mode for new policies. This feature allows you to see the impact of a policy without enforcing it immediately.
Step 6: Additional Controls and Scenarios
Conditional Access offers a rich set of conditions and controls. Consider exploring:
- Sign-in Risk Policies: Require MFA or block access if the sign-in is deemed high-risk.
- Device Compliance: Only grant access to devices that meet certain compliance standards.
- Session Controls: Enforce app-enforced restrictions, limit download or print capabilities within certain apps, or implement continuous access evaluation.
Step 7: Clean Up (Optional)
If you’ve been testing Conditional Access in a proof-of-concept environment:
- Remove the test users or groups you created.
- Disable or delete the Conditional Access policy if it’s no longer needed.

Conclusion
Congratulations!
You’ve successfully created and configured a Conditional Access policy in Azure, enabling you to apply dynamic conditions to safeguard your organisation’s resources.
By requiring additional verification steps under specific circumstances, you’ve taken a significant stride towards a more secure and Zero Trust-aligned environment.
Resources and Next Steps with Conditional Access
To continue your journey with Conditional Access, explore the following resources:
Azure Conditional Access Documentation: Azure Conditional Access documentation
Azure AD Community: Azure AD Community
Microsoft Security Blog: Microsoft Security Blog
These resources offer detailed guides, best practices, and community support to help you deepen your understanding and effectively implement these features in your environment.
I’m eager to hear your thoughts on this blog post and would greatly value your feedback. Feel free to connect with me on LinkedIn or drop me an email—links are at the top and bottom of this page. 🙂
Interested in staying updated with my latest releases? Don’t miss my future blog posts. Subscribe by entering your email in the box below, and stay tuned for every new update!
Thank you for spending part of your day here. I hope you find your journey into Azure Conditional Access as rewarding as I have.
Stay Connected,
Ryan

Leave a comment